Configure a drive
A drive in Powerhouse is a container for documents and data. It's a place where you can organize and store your documents and share them with others. This guide walks you through configuring and managing drives in your Powerhouse environment.
Before configuring a drive, ensure you have:
- Powerhouse CLI installed
- Access to a Powerhouse instance
- Appropriate permissions to create and manage drives
Understanding drives
Local drives
A local drive is a container for local documents and data, hosted on your local machine. Technically, a drive is itself a document that contains a list of the documents inside it. When you run Connect locally with ph connect, a local drive is automatically added. You can also create a new local drive by clicking 'Create New Drive' in Connect.
Remote drives vs. reactors
Remote drives in Powerhouse allow you to connect to and work with data stored in external systems or cloud services. These drives act as bridges between Powerhouse contributors or other data sources, enabling seamless data synchronization. Drives can exist in three types of locations:
- Local Storage: For offline or on-device access.
- Cloud Storage: For centralized, scalable data management.
- Decentralized Storage: Such as Ceramic or IPFS, enabling distributed and blockchain-based storage options.
Powerhouse Reactors are the nodes in the network that store and synchronize documents and drives, resolve conflicts, and rerun operations to verify document event histories. Reactors can be configured for local storage, centralized cloud storage, or a decentralized storage network.
A reactor allows you to store multiple documents and host drives and Drive Explorers with different organizational purposes, users, access rights, and more.
A drive uses a reactor and its underlying storage layer. A reactor is the low-level component that enables the synchronization of documents and drives.
Drive apps
Drive Explorers (also known as Drive Apps) are specialized interfaces that enhance how users interact with documents within a drive. As mentioned, a drive is technically just another document containing a list of other documents. This means you can create a custom editor for your drive document.
These customized editors are called Drive Explorers or Drive Apps. They provide custom views, organization tools, and interactive features tailored to specific use cases. For example, a Drive Explorer might present data as a Kanban board, provide aggregated insights, or offer specialized widgets for data processing.
To learn more about building and customizing Drive Explorers, check out our Building a Drive Explorer guide.
Creating a new drive
To create a new drive in Powerhouse, follow these steps:
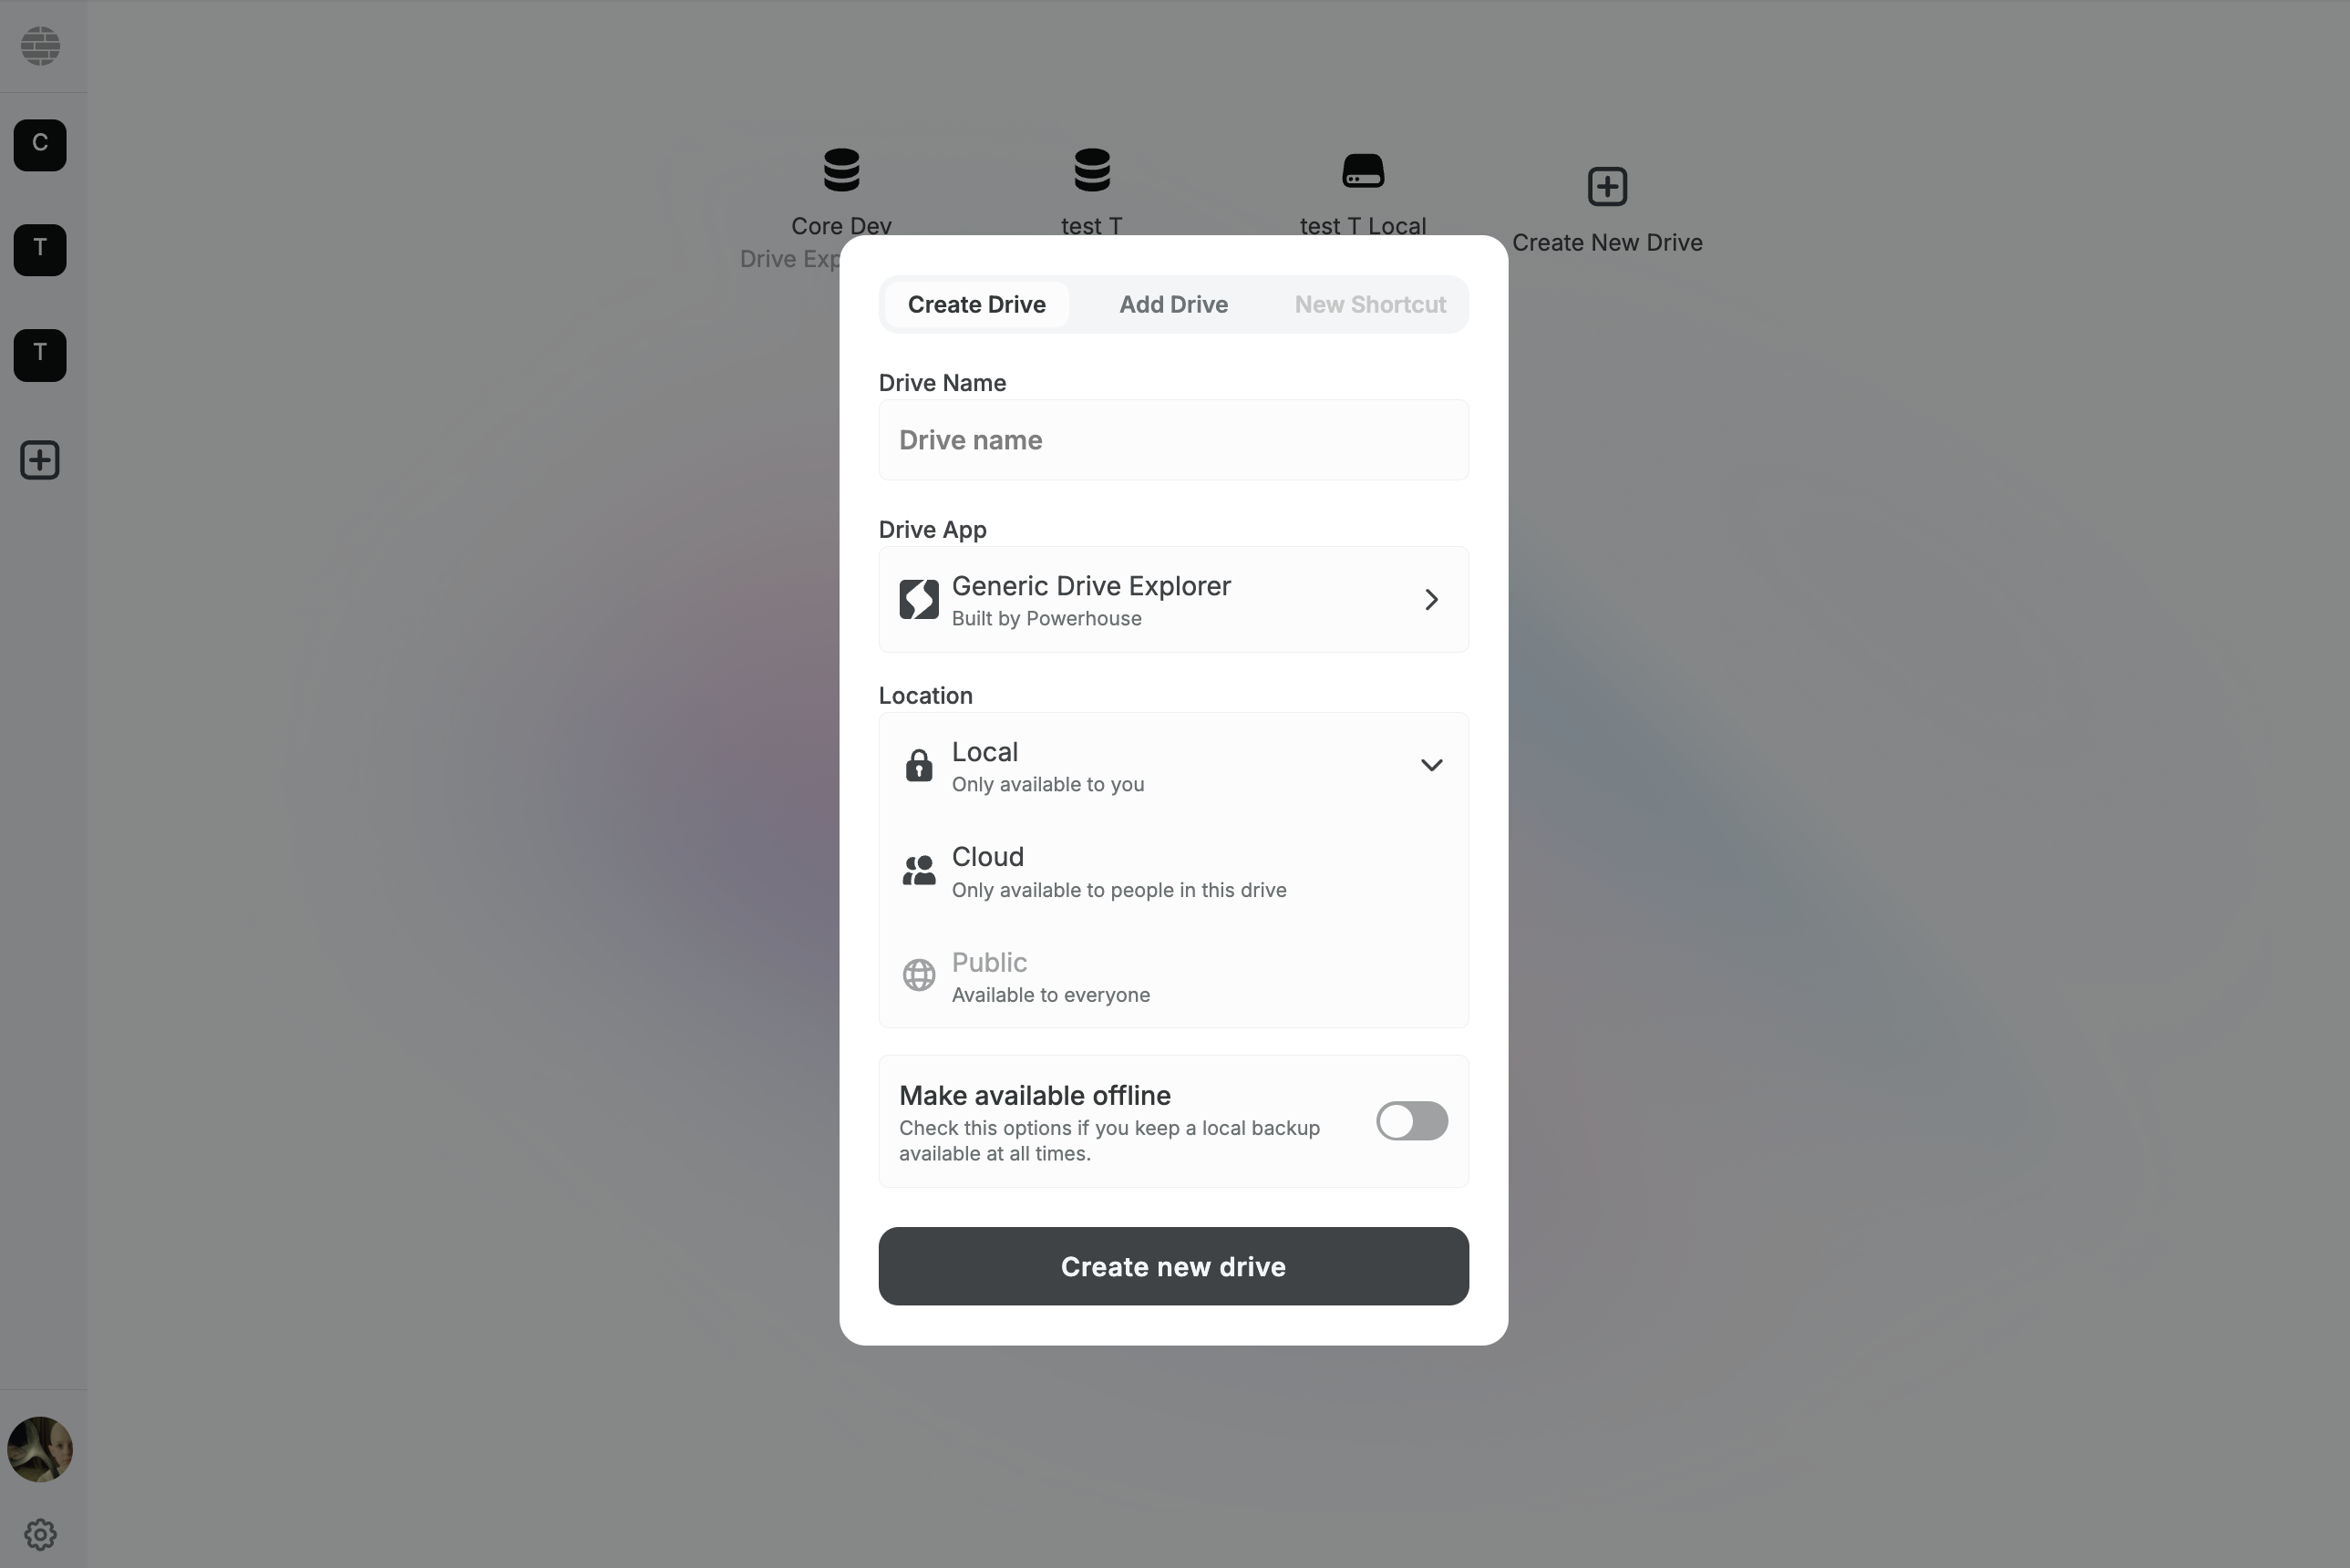
- Click the "Create New Drive" button in the Connect interface or the + icon in the Connect sidebar.
- In the modal that appears, enter a name for your drive in the "Drive Name" field.
- Select the desired Drive App (such as the Generic Drive Explorer, or any other Drive App you've installed).
- Choose the location for your drive: Local (only available to you), Cloud (available to people in this drive), or Public (available to everyone).
- (Optional) Enable the "Make available offline" toggle if you want to keep a local backup of your drive.
- Once all options are set, click the "Create new drive" button to finalize and create your drive.
Add a new remote drive via GraphQL mutation
You can also add a new remote drive to your Connect environment programmatically using GraphQL mutations. This is especially useful for automation, scripting, or integrating with external systems.
- Access to the Switchboard or remote reactor (server node) of your Connect instance. In your local project, you can start your Reactor by running the following command in a different terminal from Connect Studio.
bash ph reactor - The GraphQL endpoint of your instance. For example, for the staging environment, use:
https://staging.switchboard.phd/graphql/system(this is a supergraph gateway. Read more about subgraphs and supergraphs here. - Appropriate permissions to perform mutations.
1. Navigate to the GraphQL Playground or use a GraphQL client
- Open https://switchboard.phd/graphql/system in your browser, or use a tool like GraphQL Playground.
2. Prepare the Mutation
- Use the following mutation to create a new drive:
mutation Mutation(
  $name: String!
  $icon: String
  $addDriveId: String
  $slug: String
) {
  addDrive(name: $name, icon: $icon, id: $addDriveId, slug: $slug) {
    icon
    id
    name
    slug
  }
}
- These are the example variables, feel free to change these as you like and add a different name or logo for your drive:
{
  "name": "AcademyTest",
  "icon": "https://static.thenounproject.com/png/3009860-200.png",
  "addDriveId": null,
  "slug": null
}
- You can also provide a custom
idorslugif needed.
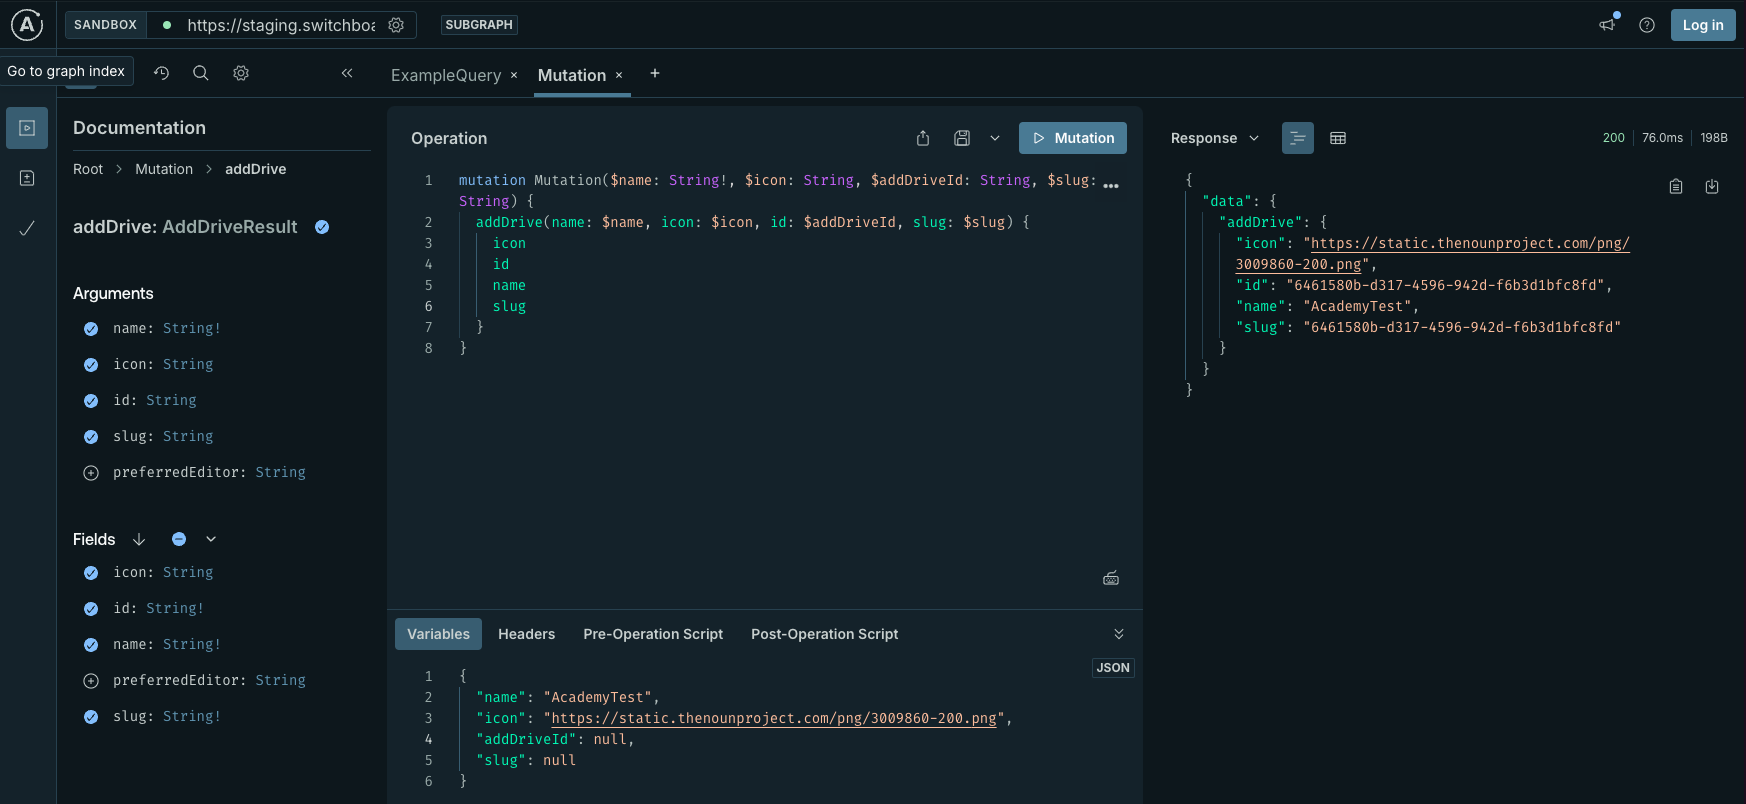
3. Execute the Mutation
- Run the mutation. On success, you will receive a response containing the new drive's
icon,id,name, andslug:
{
  "data": {
    "addDrive": {
      "icon": "https://static.thenounproject.com/png/3009860-200.png",
      "id": "6461580b-d317-4596-942d-f6b3d1bfc8fd",
      "name": "AcademyTest",
      "slug": "6461580b-d317-4596-942d-f6b3d1bfc8fd"
    }
  }
}
4. Construct the Drive URL
- Once you have the
idorslug, you can construct the drive URL for Connect:- Format:
domain/d/<driveId>ordomain/d/<driveSlug> - Depending on whether you are using a hosted or a local environment, the domain in your URL will change.
- Example:
https://connect.phd/d/6461580b-d317-4596-942d-f6b3d1bfc8fd - Example:
https://localhost:4001/d/6461580b-d317-4596-942d-f6b3d1bfc8fd
- Format:
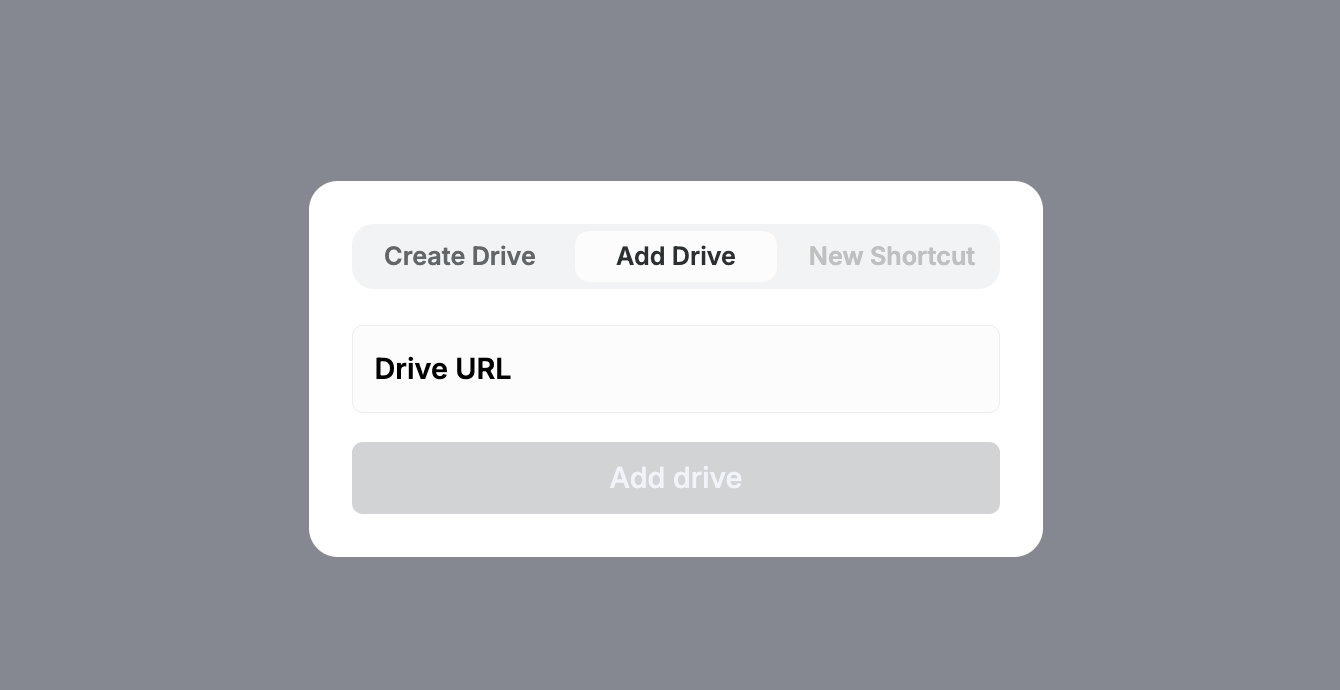
5. Add the Drive in Connect
- Use the constructed URL to add or access the drive in your Connect environment via the 'Add Drive' button.
This approach allows you to automate drive creation and integration with other systems, making it easy to manage drives at scale.
Up next
You've now experienced the use of GraphQL to modify or read data captured in Powerhouse for the first time. You can now either continue with:
- User interfaces and build a custom drive experiences
- Keep playing with data and the Switchboard API
Enjoy!