Define the chatroom document model
In this tutorial, you will learn how to design your document model and export it to be later used in your Powerhouse project. If you don't have a document model created yet, have a look at the previous steps of this tutorial to create a new document model.
Before you start, make sure you have the Connect application running.
Chatroom document model schema
We use GraphQL Schema Definition Language (SDL) to define the document model schema. Below, you can see the SDL for the ChatRoom document model.
This schema contains the data structure of the document model and the basic operations that can be performed on the document model. For more in depth information please visit State Schema
State schema (See next steps)
# Defines a GraphQL type for the state of the chatroom document
type ChatRoomState {
  id: OID! # Unique identifier for the chat-room
  name: String! # Name of the chat-room
  description: String # Optional description of the chat-room
  createdAt: DateTime! # Timestamp of when the chat-room was created
  createdBy: ID! # Agent ID of the user who created the chat-room
  messages: [Message!]! # List of messages in the chat-room
}

# Defines a GraphQL type for the state of a message
type Message {
  id: OID! # Unique identifier for the message
  sender: Sender! # Agent details of the message sender
  content: String # Message content
  sentAt: DateTime! # Timestamp of when the message was sent
  reactions: [Reaction!] # Reactions to the message
}

# Defines a GraphQL type for the state of a sender
type Sender {
  id: ID! # Unique identifier for the sender
  name: String
  avatarUrl: URL # Allows us to pull the ENS and/or nft of the persons profile
}

# Defines a GraphQL type for the state of a reaction to a message
type Reaction {
  type: ReactionType! # Type of reaction (one of the predefined emoji)
  reactedBy: [ID!]! # Agent ID of the user who reacted
}

# Defines the various predefined emojis to react to a message
enum ReactionType {
  THUMBS_UP
  THUMBS_DOWN
  LAUGH
  HEART
  CRY
}
Operations schema (See next steps)
# add_message

input AddMessageInput {
  messageId: OID! # ID of the message that is being added
  sender: Sender! # ID of the user sending the message
  content: String! # Content of the message
  sentAt: DateTime!
}

input AddEmojiReactionInput {
  messageId: OID! # ID of the message to which the reaction is being added
  reactedBy: ID! # ID of the user adding the reaction
  type: ReactionType! # Type of the reaction (emoji)
}

input RemoveEmojiReactionInput {
  messageId: OID! # ID of the message to which the reaction is being removed
  senderId: ID! # ID of the user that is removing the reaction
  type: ReactionType! # Type of the reaction (emoji)
}

input EditChatNameInput {
  name: String
}

input EditChatDescriptionInput {
  description: String
}
Define the document model
To be able to define the document model, you need to open the Chatroom document model editor in Connect.
The steps below show you how to do this:
-
In the Connect application, click on the
ChatRoomdocument model you've created in the previous step, to open the document model editor. -
You'll be welcomed with a form to fill, this is metadata about the document model, fill in the details in the fields.
In the
Document Typefield, typepowerhouse/chat-room. This defines the new type of document that will be created with this document model.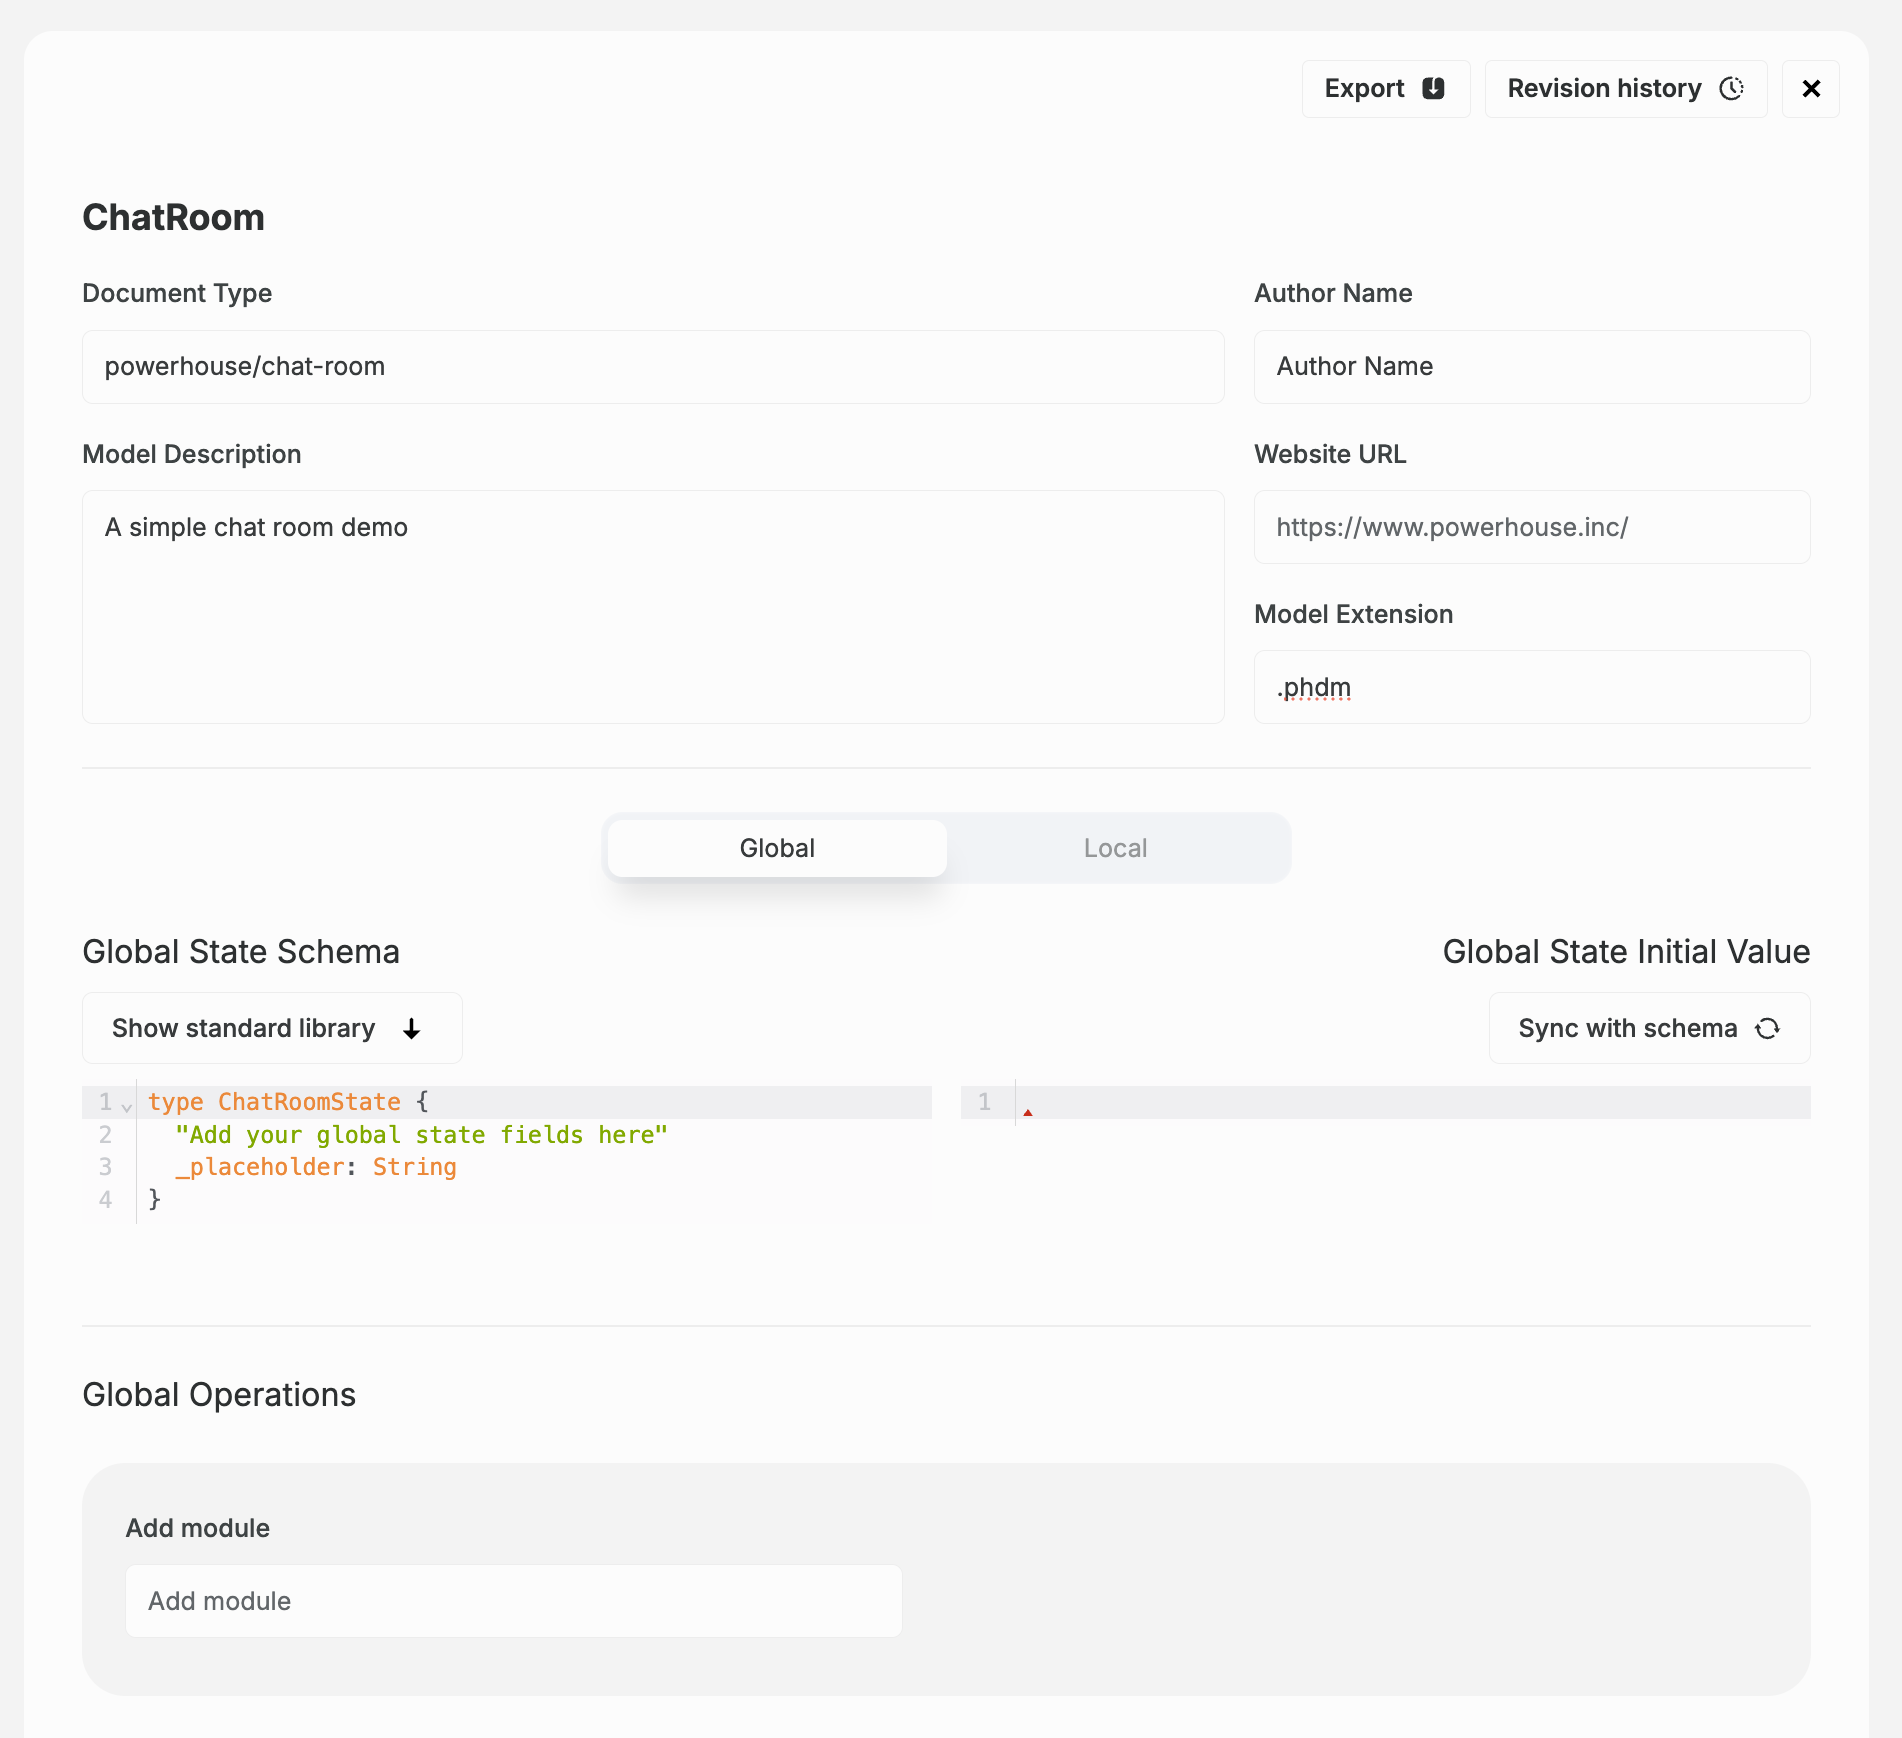
-
In the code editor, you can see the SDL for the document model. Replace the existing SDL with the SDL defined in the State Schema section above. Only copy and paste the types, leaving the inputs for the next step. You can however already press 'Sync with schema' button to set the initial state of your document model based on your Schema Definition Language. Verify that your Global State Initial Value looks like this.
{
  "id": "",
  "name": "",
  "description": "",
  "createdAt": "",
  "createdBy": "",
  "messages": ""
}
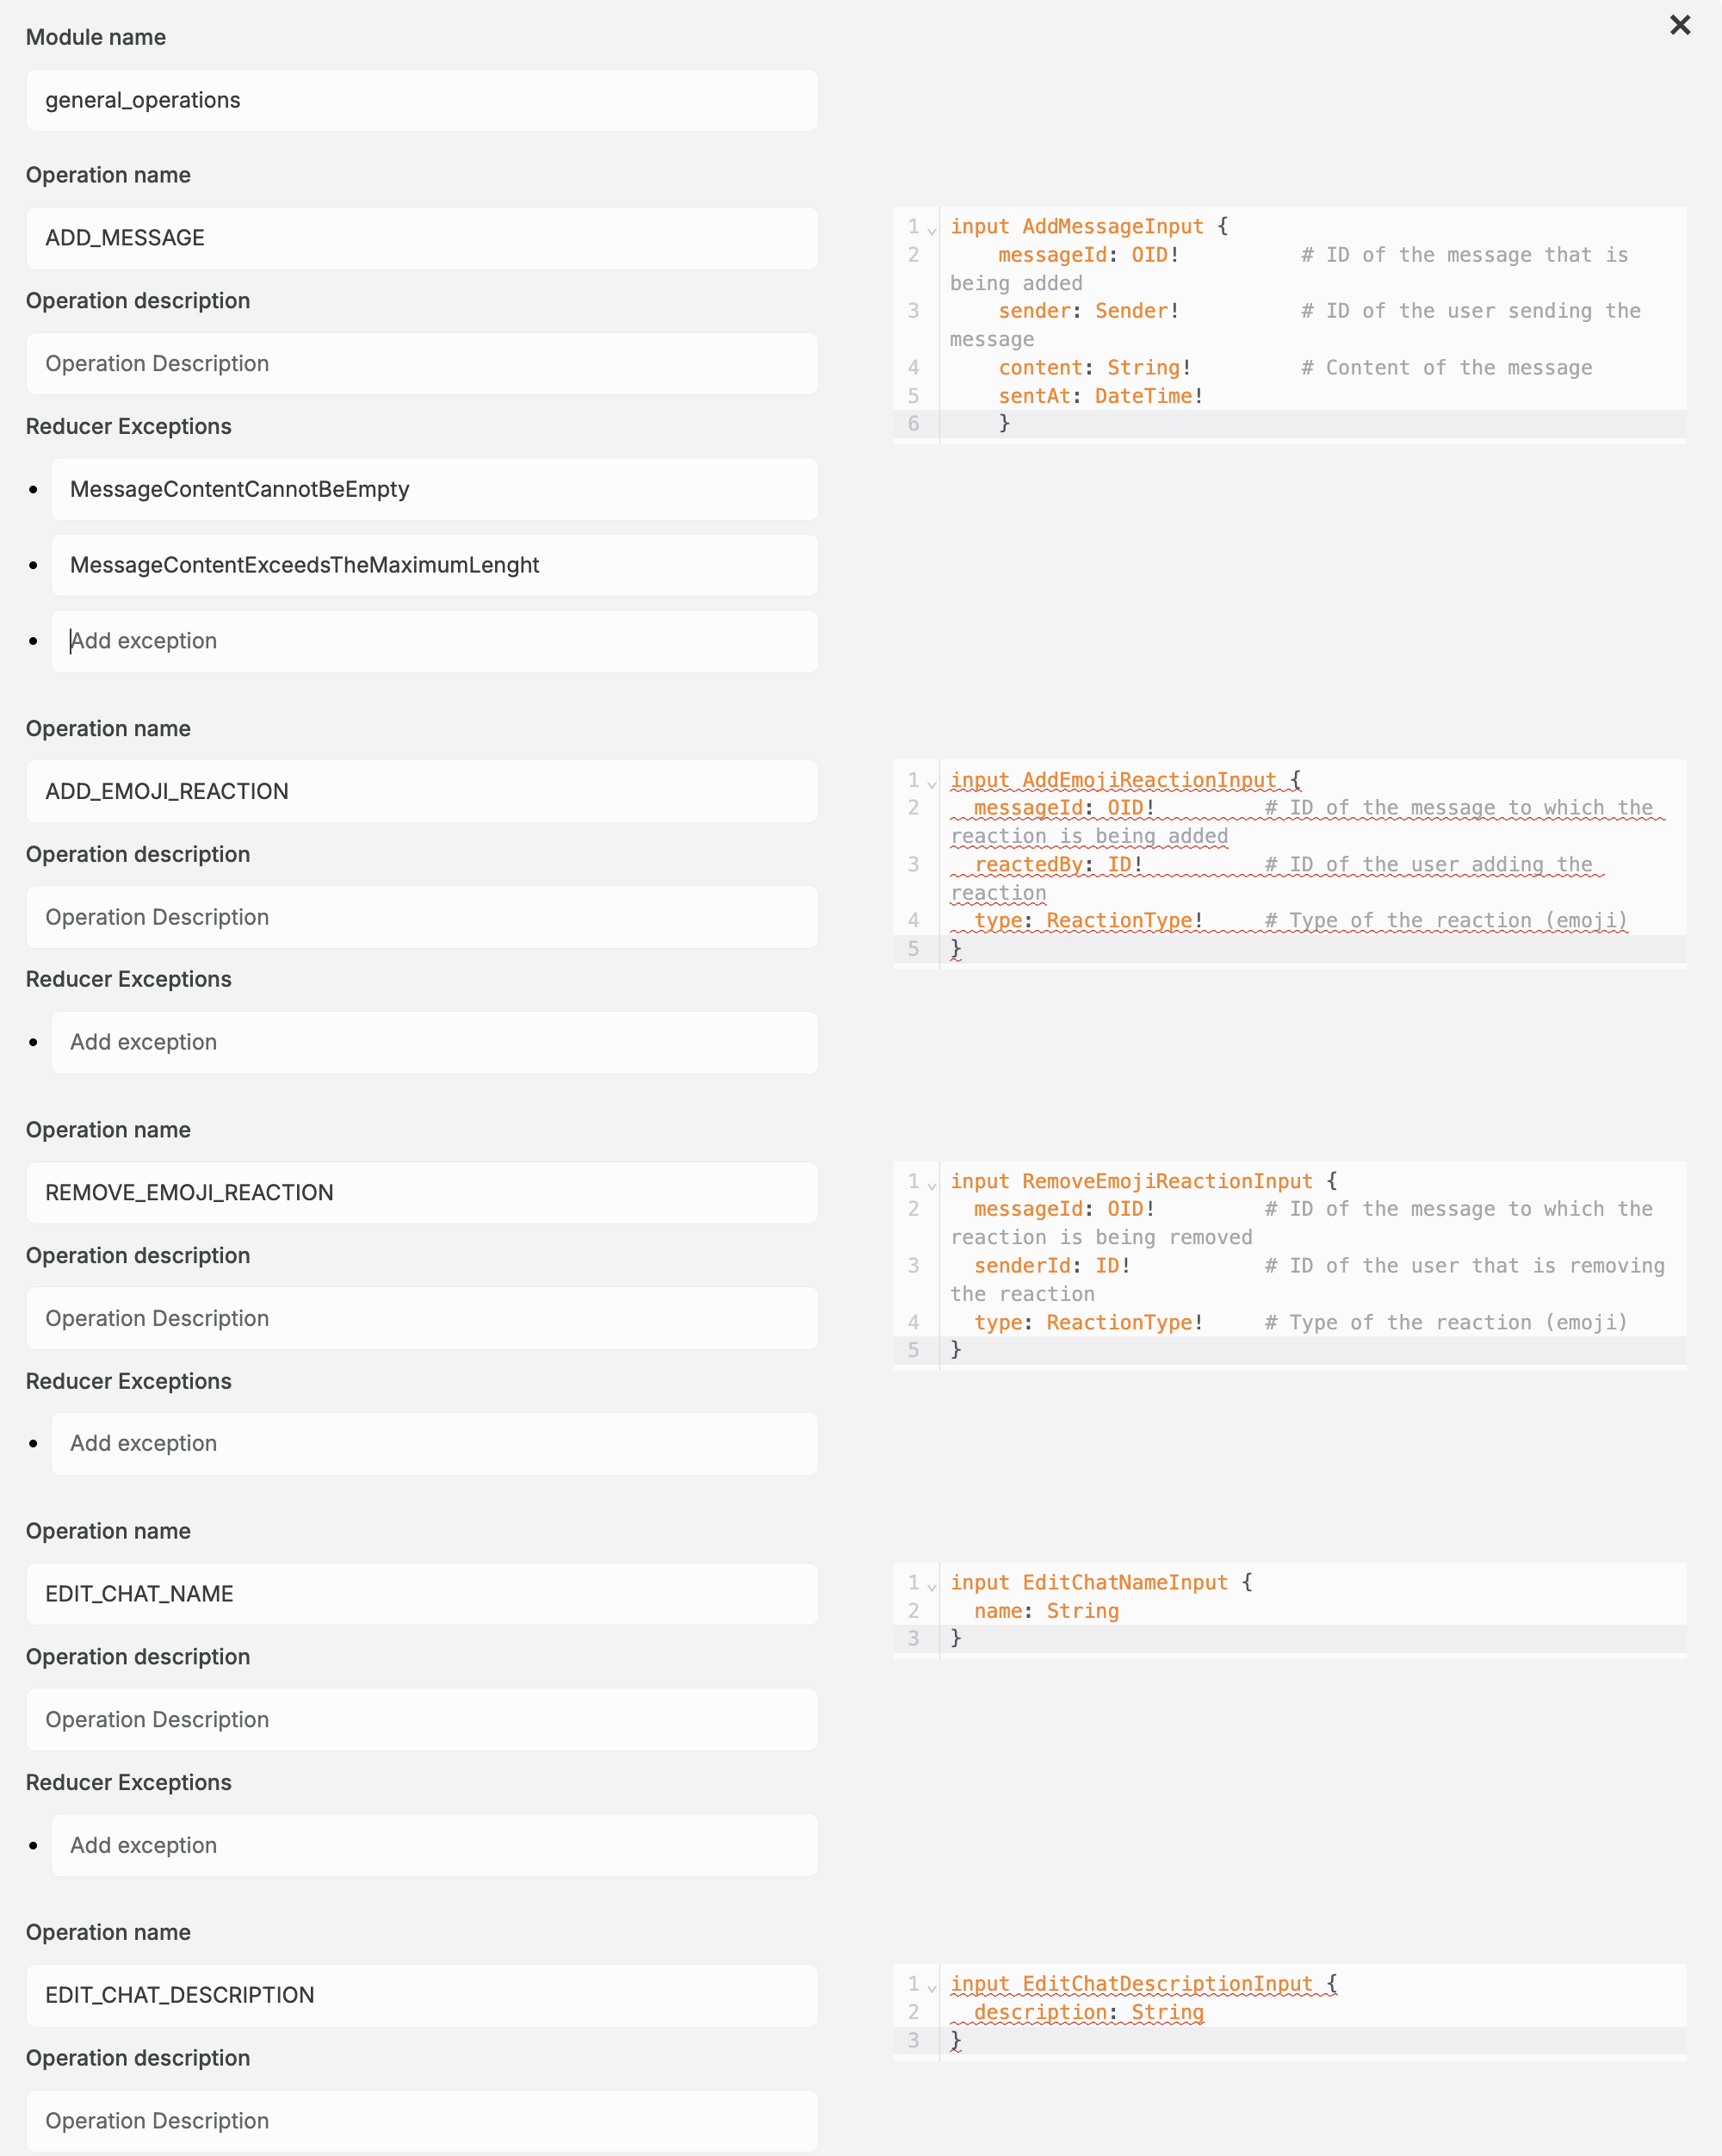
- Below the editor, there is an input field 'Add module'. You need to create and name a module that the input operations will be added to. In this case, we will name the module 'general_operations'. Press enter.
- Now there is a new field, called 'Add operation'. Here you will have to add each input operation to the module, one by one.
- Inside the 'Add operation' field, type 'ADD_MESSAGE' and press enter. A small editor will appear under with an empty input type that you have to fill. Copy the first input type from the Operations Schema section and paste it in the editor. The editor should look like this:
input AddMessageInput {
  messageId: OID! # ID of the message that is being added
  sender: Sender! # ID of the user sending the message
  content: String! # Content of the message
  sentAt: DateTime!
}
- Repeat step 6 for the other input operations based on the Operations Schema. If you noticed, you only need to add the name
(ADD_EMOJI_REACTION, EDIT_CHAT_NAME, etc)of the operation without theinputsuffix. Then it will be generated once you press enter. - Let's just add a couple more reducer exceptions to the
ADD_MESSAGEoperation which we'll be using later to avoid empty messages or messages exceeding a maximum lenght. AddMessageContentCannotBeEmptyandMessageContentExceedsTheMaximumLenghtto the reducer exceptions ofADD_MESSAGE - Once you have added all the input operations, click on the
Exportbutton, at the top right of the editor, to save the document model on your local machine. Ideally you already save your file in the root of your powerhouse project on your machine.
Check the screenshot below to verify the complete implementation: