Publish your package
This tutorial is a step by step guide tackling the following topics:
- the process of building a powerhouse project
- the process of publishing it as a package
Let's start with some key concepts that will help you understand the process we're going to go through in this tutorial.
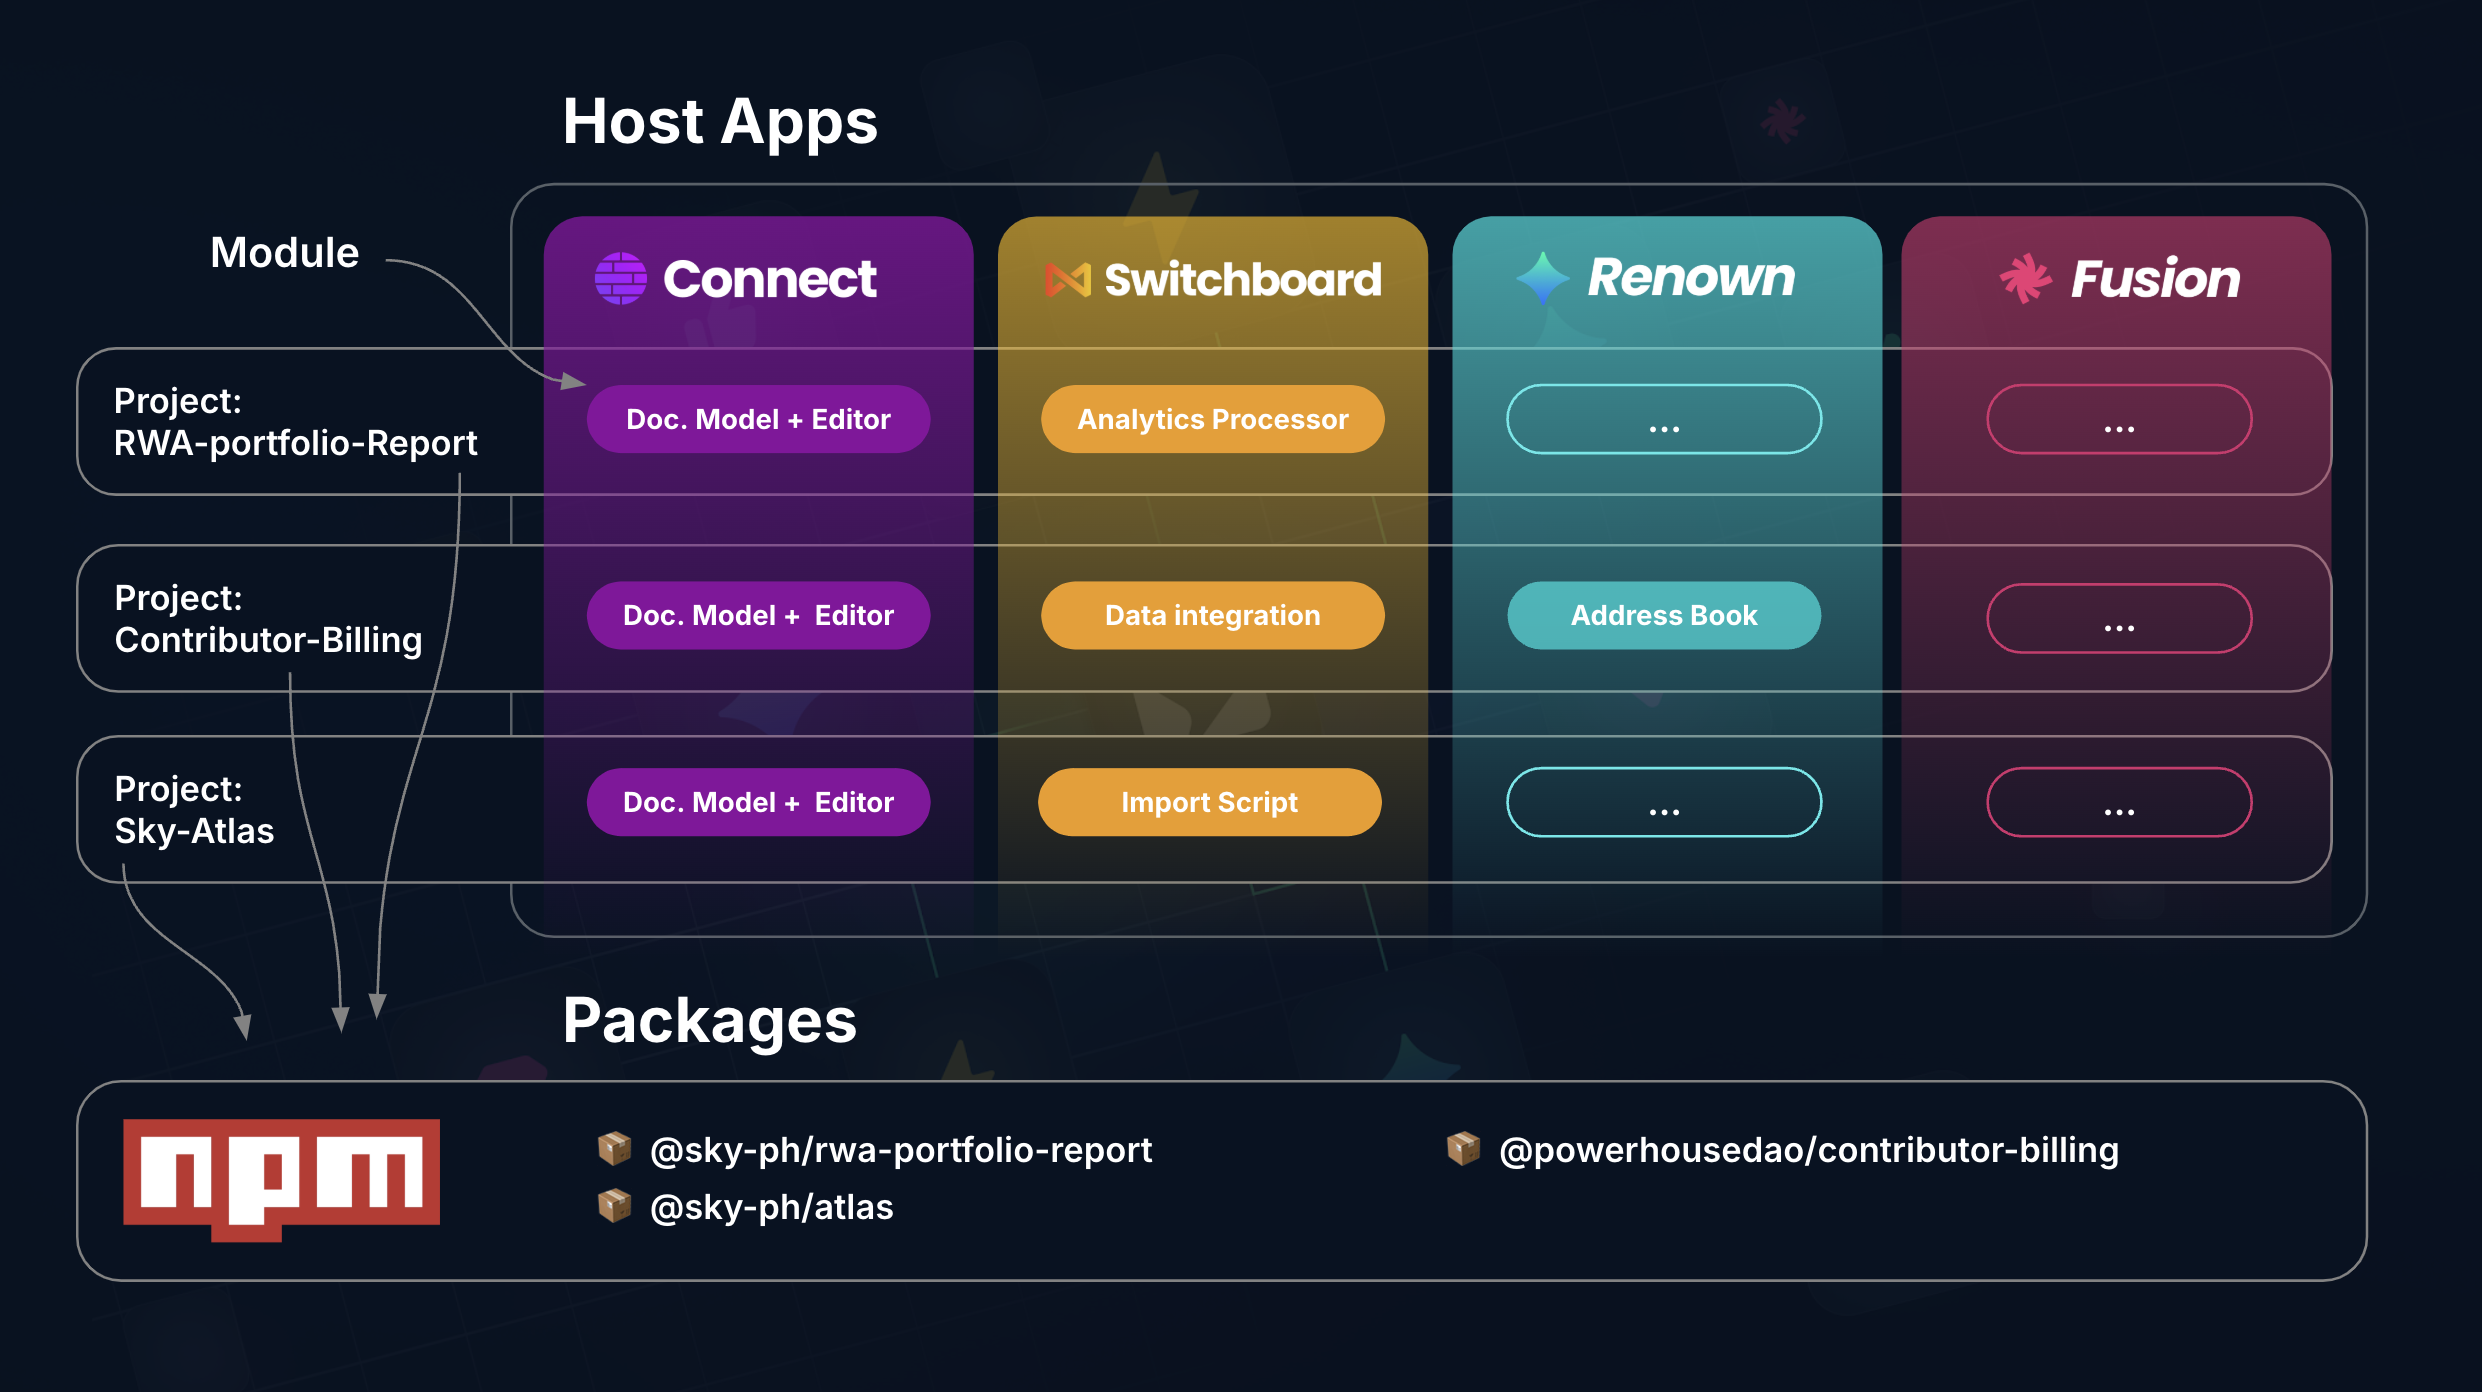
- Powerhouse Project: The construction site of your package: A project is built with document models and editors which you will publish to NPM as a package with modules.
- Powerhouse Modules: The modules that are part of your project, such as the document models, editors, processors or scripts.
- Powerhouse Drive Apps: Customized drive interfaces that function as a drive add and enhance or augment the functionality of your documents and workflows within the drive.
- Powerhouse Package: A package is a collection of modules that are published to NPM and can be installed on a server instance or locally on your machine with help of the host apps such as Connect, Switchboard & Fusion. Organizations build packages for specific purposes or workflows.
1. Building your project
To start building your project with it's dedicated document models and editors we'll run the following command:
ph init
Command not working? Did you install ph-cmd?
The Powerhouse CLI (ph-cmd) is a command-line interface tool that provides essential commands for managing Powerhouse projects. You can get access to the Powerhouse Ecosystem tools by installing them globally using:
pnpm install -g ph-cmd
For experimental features, use --version [version] which allows selecting a specific branch of our document-model-boilerplate. There are --dev and --staging options. Select ph init --dev to use the latest development version. Please be aware that this version can contain bugs and experimental features that aren't fully tested.
Key commands include:
ph connectfor running the Connect application locallyph switchboardorph reactorfor starting the API serviceph initto start a new project and build a document modelph helpto get an overview of all the available commands
This tool will be fundamental on your journey when creating, building, and running document models
Got ph-cmd installed, but command not working? Reset your package manager cache
If you need to reset your package manager, you can run the following commands for your package manager: (pnpm, npm, yarn)
pnpm cache verify
pnpm store prune
pnpm cache clean --force

npx clear-npx-cache

npm cache verify
npm cache clean --force
npm cache verify

yarn cache list
yarn cache clean --force
yarn cache list
How to make use of different branches?
When installing or using the Powerhouse CLI commands you are able to make use of the dev & staging branches. These branches contain more experimental features then the latest stable release the PH CLI uses by default. They can be used to get access to a bugfix or features under development.
| Command | Description |
|---|---|
| pnpm install -g ph-cmd | Install latest stable version |
| pnpm install -g ph-cmd@dev | Install development version |
| pnpm install -g ph-cmd@staging | Install staging version |
| ph init | Use latest stable version of the boilerplate |
| ph init --dev | Use development version of the boilerplate |
| ph init --staging | Use staging version of the boilerplate |
| ph use | Switch all dependencies to latest production versions |
| ph use dev | Switch all dependencies to development versions |
| ph use prod | Switch all dependencies to production versions |
Please be aware that these versions can contain bugs and experimental features that aren't fully tested.
1.1. Specifying your project details
When you are creating your own project, you will be asked to name your project. Which will also become the package name when someone else wants to install it in a cloud environment via npm in the future.
Please feel free to navigate to the package.json file and fill in all the other available fields such as name, version, author, license and main.
{
"name": "@your-org-ph/package-name",  #Your organization name with the -ph suffix to indicate it's a powerhouse related organization & package.
"version": "1.0.0",
"author": "Your Name",
"license": "AGPL-3.0-only",
"main": "index.js"
}
Now that you've created your powerhouse project you are ready to generate the necessary directory and file structure to add your document models.
ph generate
The generate command will start the configuration of your powerhouse project and generates a directory with the necessary files and folders to build your project. These include:
document-models: A folder containing the document models schemas you've defined in Connect Studio Mode.editors: A folder containing the editors you've defined in react, potentially making use of the reusable components.processors: A folder containing the processors you might be running on your document models later on.scripts: A folder containing the scripts you might use.tests: A folder containing your unit tests.
1.2. Adding document models, editors and unit tests
Now that you've set up your directory. Go ahead and add the document models you'd like to add by going through the standard document model building flow:
These steps are explained more in depth in any of our tutorials. Follow along with one of the tutorials that matches your project the most.
- Defining your Document Model GraphQL Schema in the document model document editor by launching the document model editor in Connect Studio Mode with the
ph connectcommand. - Defining your Document Model Operations in the document model document operations editor and their graphQL counterparts.
- Generating the scaffolding code by exporting the Zip file from connect and importing it into your project. (Save it in the directory you've created in the previous step) Run
ph generate <zipfile>. - Implementing the reducer code and unit tests of your document models reducers.
- Implementing the document editors to visualize and interact with your document models.
- Run unit tests and verify the editor functionality via
ph connectfor local testing. - Add a manifest file to your project and updating your index.js file to export your modules.
1.3. Verifying your project
Now that we've completed our directory with the reducers, tests and editors, and your project is populated with modules we'll verify the build output and see if everything is working correctly.
Let's verify the package build output with the following command:
pnpm build
This command will build the project and create a build directory with the output. The code gets optimized and minified. It optimizes the code for production and distribution so different environments can use it as a package.
This command will start a local server and serve the build output.
Inspect the build output and verify that the document models are working correctly.
Instead of pnpm serve, we'll be using:
ph connect
1.4 Storing your project in a git repository
Now that you've verified your project is working correctly, you can store your project in a git repository. Why?
- So you can track the changes of your project in a remote repository and benefit from the collaboration features of git.
- So you can publish your project to the npm registry and install it on a server instance or locally on your machine.
If you stick to the layout generated by the ph init command, where its folders for document models and editors, you should later be able to install your package with ph install @<your-org/package-name> once it's published to the npm registry.
git init
git add .
git commit -m "Initial commit"
This will initialize a git repository and add all the files to the repository.
2. Publishing your project
For this step you'll need to register your organization on npm. If you haven't already registered your organization on npm, you can do so by running the following command:
pnpm adduser
Create an organization on NPM using the naming convention: @yourorganization-ph
- The
-phsuffix indicates its a Powerhouse ecosystem package to help you and others identify it from regular NPM packages. - Example:
@acme-ph
To make sure you can differentiate between Powerhouse ecosystem packages and other packages we recommend setting up a separate npm account for your organization with the -ph suffix. example: @yourorg-ph We advise you to use a dedicated npm account for your organization and not your personal account.
Once you've registered your organization on npm, you can now publish your project to the npm registry. Log in via the command line:
npm login
You'll be prompted for your username, password, and email in a separate browser window.
Once you've logged in, you can configure your package.json for npm before publishing.
If you're publishing a package under a scope (like @your-org/my-package), you might need to add the publishConfig to ensure it's public, otherwise scoped packages default to private:
{
  "name": "@your-org/my-package",
  "version": "1.0.0",
  "main": "index.js",
  "publishConfig": {
    "access": "public"
  }
}
2.1 Versioning, tagging, and publishing your package
Before publishing, it's crucial to version your package correctly and tag the release in your Git repository. This helps track changes and allows users to depend on specific versions.
1. Versioning with pnpm
Use the pnpm version command to update your package version according to semantic versioning rules (patch for bugfixes, minor for new features, major for breaking changes). This command will:
- Update the
versionin yourpackage.json. - Create a Git commit for the version change.
- Create a Git tag for the new version (e.g.,
v1.0.1).
# For a patch release (e.g., from 1.0.0 to 1.0.1)
pnpm version patch

# For a minor release (e.g., from 1.0.1 to 1.1.0)
pnpm version minor

# For a major release (e.g., from 1.1.0 to 2.0.0)
pnpm version major
Take note of the new version tag created (e.g., v1.0.1), as you'll need it in the next step.
2. Pushing changes to Git
Next, push your commits and the new version tag to your remote Git repository:
# Push your current branch (e.g., main or master)
# Replace 'main' with your default branch name if different
git push origin main

# Push the specific tag created by pnpm version
# Replace vX.Y.Z with the actual tag name (e.g., v1.0.1)
git push origin vX.Y.Z
The specific tag name (e.g., v1.0.1) is usually output by the pnpm version command. Pushing the specific tag is recommended to avoid unintentionally pushing other local tags.
Alternatively, to push all new local tags (use with caution):
# git push --tags
3. Understanding Git tags vs. npm distributor tags
It's important to distinguish between Git tags and NPM distributor tags (dist-tags):
- Git Tags: These are markers in your Git repository's history. They are primarily for developers to pinpoint specific release versions in the codebase (e.g.,
v1.0.0,v1.0.1). Thepnpm versioncommand creates these. - NPM Distributor Tags (dist-tags): These are labels used by the NPM registry to point to specific published versions of your package. Common NPM tags include:
latest: This is the default tag. When someone runspnpm install my-package, NPM installs the version tagged aslatest.beta,next,alpha: Often used for pre-release versions. When you publish a package without specifying an NPM tag, it usually gets thelatesttag by default.
4. Publishing to npm
Now you are ready to publish your package to the NPM registry. Ensure you are logged into NPM (the npm login command shown in previous steps should be used, or pnpm login which is an alias).
pnpm publish
This command will publish the version of your package that is currently specified in your package.json. By default, this will also set the latest NPM dist-tag for this version.
If your package is scoped (e.g., @your-org/my-package) and intended to be public, ensure your package.json includes the publishConfig shown earlier. If this is not set in package.json (and your package is scoped), you might need to use:
pnpm publish --access public
You can also publish a version to a specific NPM dist-tag. For example, to publish a beta version:
# Ensure your package.json version reflects the beta (e.g., 1.1.0-beta.0)
pnpm publish --tag beta
This is useful for testing releases before making them latest.
Now let's verify that the package(s) get published in the package repository, next to pre-existing packages that you might have been publishing before.
3. Deploying the host apps and project
Now that we've installed all the necessary services on our server instance, we can start deploying the host apps & our packaged project from npm.
Install your project package we've published earlier on your local connect (ph connect) instance by running the following command:
ph install @<your-org/package-name>
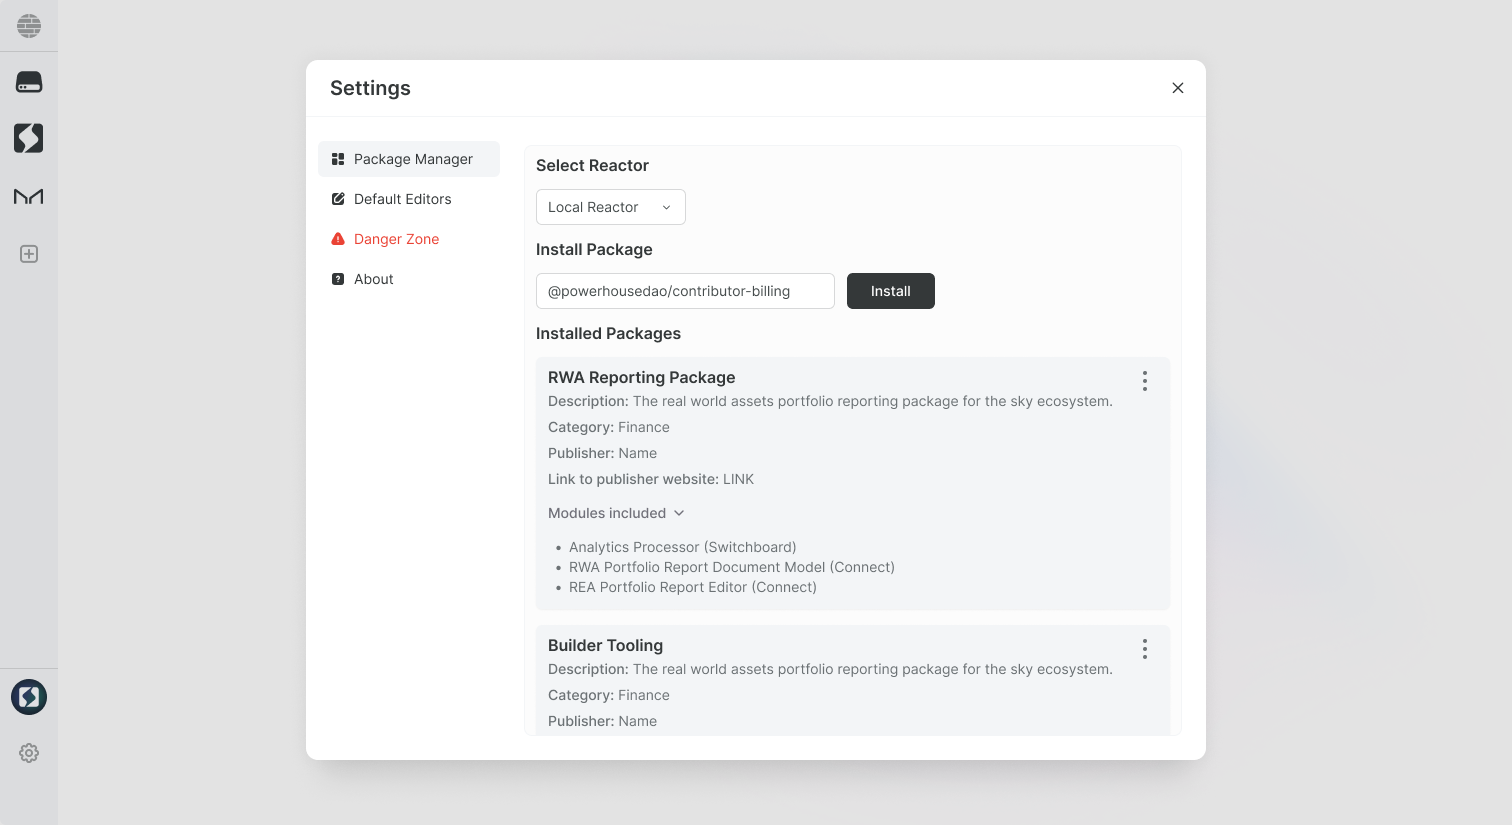
Alternatively you can also install the package in the settings of Connect in the 'package manager' section. (Not available yet)
Where you'll be able to use the same package name as you've used in the package.json file and install it at the click of a button.
Got this far? Congratulations on publishing your first package!